She didn't know about it so I explained and sent her home with a length of freezer paper from my stash.
And I realised it was probably a good time to show how you can use the technique to add individuality to your mini projects. Today I'm wanting to make some cushions to go with the vintage London theme of yesterday's scene and (finally) print some Marimekko Unikko fabric as a test.
What you'll need:
* Cotton fabric (I used a light white poplin)
* Freezer paper
* A piece of A4-sized card to draw around
* General craft supplies: a cutting board, a pencil and scissors
* A metal ruler and rotary cutter (or just use the scissors and a steady hand)
* An iron and ironing board (if you use one)
* A piece of old clean wood (or similar flat surface: I use an old art board) and an old pillowcase or length of fabric to cover it
* Your computer, the internet and Word
* An inkjet printer.
Step one: Gather your supplies.
 Step two: Using the piece of A4 card as a template, mark off an A4-sized piece of your freezer paper on the matte side. (I use the edge of the paper as one of the edges of my piece, saving extra cutting.)
 Step three: Roughly cut around the outside of your marked-out areas.
 Step four: Set the iron to cotton and dry.
 Step five: Iron the fabric smooth (use a spray bottle if necessary, but ensure the fabric is completely dry before proceeding to the next step)
 Step six: Place the wooden surface on the ironing board and cover with the old pillowcase or fabric.
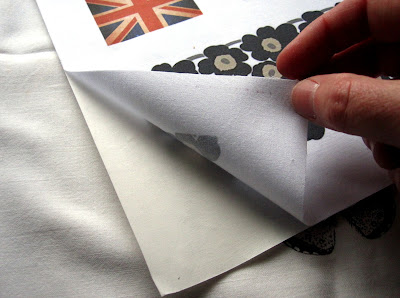
 Step seven: Iron the freezer paper onto the fabric, shiny side towards the fabric.
  Step eight: Cut along the marked lines.
 Step nine: Clean up any dangling threads.(You don't want to kill your printer now, do you?)
 Step ten: Iron the edges of your pieces to ensure they are attached firmly. Focus particularly on the leading edge.
 Step eleven: Choose and harvest your images (I don't need to remind you about copyright and personal use only and stuff, do I?)
  Step twelve: Create a new Word document, inserting your images and resizing them to the correct size (I left plenty of room around my images to use as seam allowances on my "vintage tea towel" cushions.)
Step thirteen: Insert your fabric/ freezer paper piece into your printer, making sure the fabric is the side that will be printed. Set your printing preferences to best quality printing and hit print.
See the pieces in use in this scene.
_________________________________________________________________________
Read my other modern miniature tutorials:
Paint a vase with nail varnish
Make a floor rug out of a placemat
Turn stickers into modern placemats
Refinish a discount-store side table
Print an iPod, mobile phone or other electronic device
Make a duck-board bathmat out of tongue depressors.


10 comments :
You can use 'bubble jet set' if you want it to endure a wash...
an excellent set of stepbysteppies.
Brilliant, thankyou. Will definately bookmark this page.
I'm having an experiment with a bottle of ink jet set gifted to me last year. But first I have to think of something coloured that I want to wash.
I've found printing with the black ink cartridge is stable for washing after being heat set by an iron.
Thank you, I didn't know this technique! Worth your weight in gold, you are.
Clever thing, you! Thanks for the tip!
Sorry if this is a bit of a silly question but if your putting it on tea towels how do you wash them if they aren't colour fast?
Great project I didn't realise you could use freezer paper for anything other than to wrap food in
I never need to wash my dolls' house tea towels because I refuse point blank to do my dolls' house dolls' dishes.
Mainly because there never seem to be any to do...
Besides, these ones are being made into dolls' house cushions. Which I've never washed either.
If you have the need to wash your dolls' linen you might like to use one of the ink setting products on the market before your print your fabric :-)
I finally attempted this & it turned out perfectly! Thank you so much for sharing :)
Hi Lisa
You're very welcome. Thanks for letting me know!
Post a Comment